Prior Weeks Homework
WEEK 6 - 1/9/23
Continue practicing what we worked on in class and grow the behaviors. Check the Prior Homework page if you need a refresher on any of these:
Chill Out
Touch
Reinforcement Zone
Game On
PB&J (Push Back & Jam
IYC (It's Yer Choice)
Collar Grab
Basic Obedience
Cone work
Targeting
Tandem Turn and Front Cross on Cone
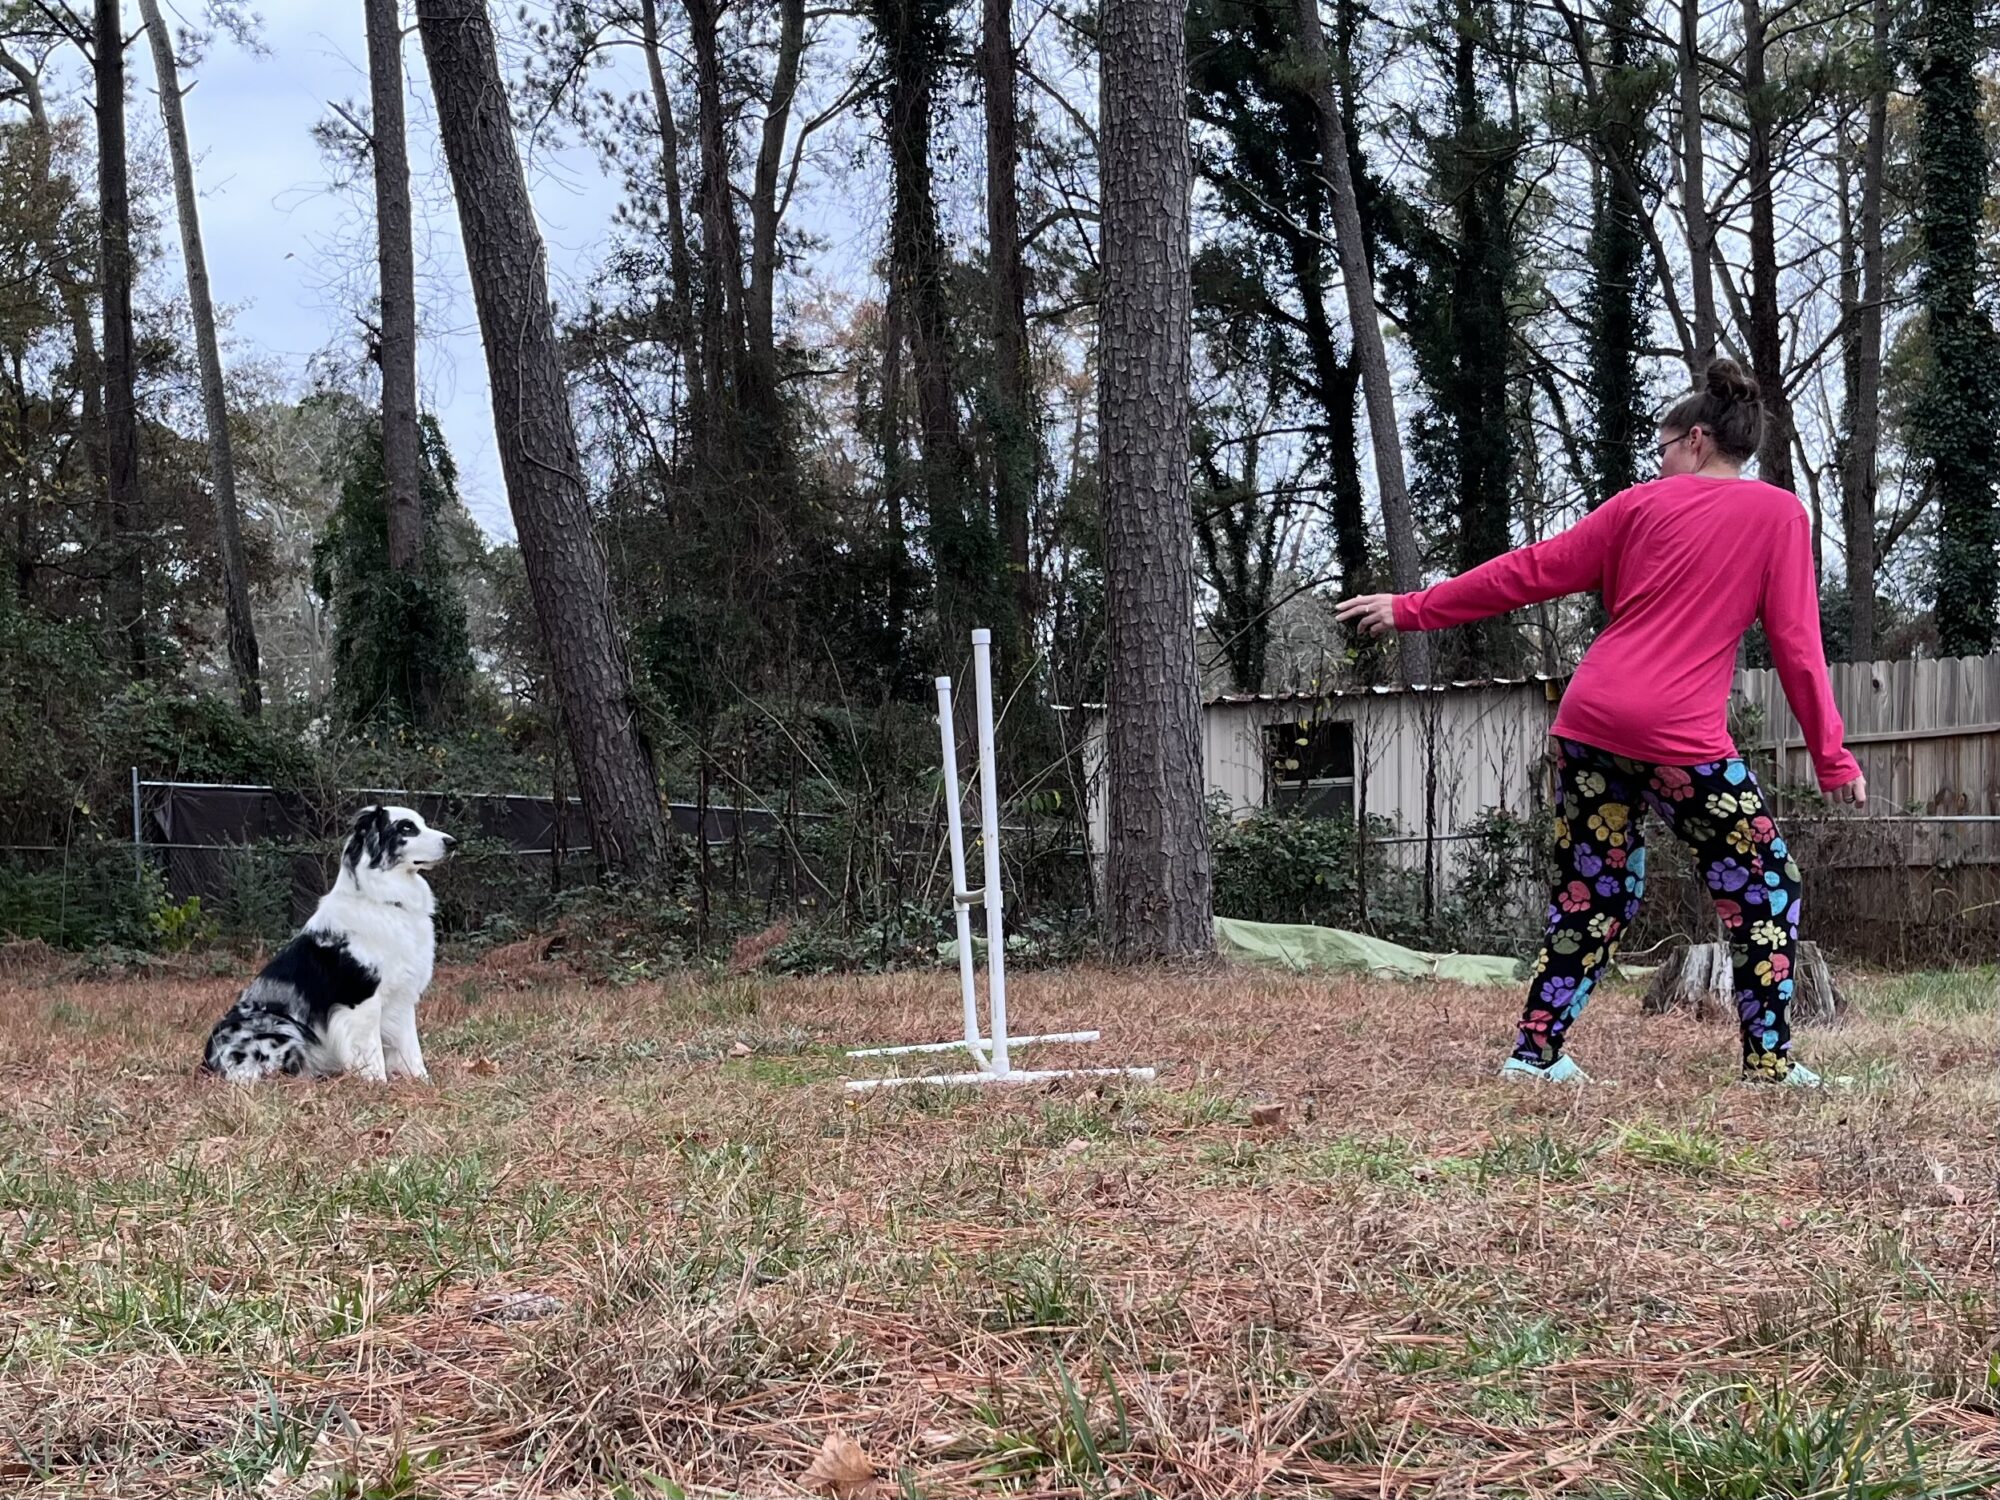
Practice with just one cone (or a small trash can) using both tandem turns and front crosses:
Expanding the cone game is an important element of learning handling. Be sure to work both types of turns and on both sides.
It is a good idea at this point to start adding a verbal command to your cone work. You can use “check” or the “chchch” sound to indicate that the dog is going around the cone and returning to you. For basic conework, I don’t always use it but it is very helpful to have and will be a good tool in your toolbox once we start doing wraps and/or multiple turns.
Tandem Turn (the dog turns with you and remains on the original side):
- With dog starting on your left side:
- Send the dog around the cone and when the dog is on the far side of the cone, continue your rotation for 180 degrees and pick the dog back up on the original left side.
- With dog starting on your right side:
- Send the dog around the cone and when the dog is on the far side of the cone, continue your rotation for 180 degrees and pick the dog back up on the original right side.
- With dog starting on your left side:
- Send the dog around the cone and when the dog is on the far side of the cone, turn the opposite direction from your dog 180 degrees and pick the dog back up on the right side.
- With dog starting on your right side:
- Send the dog around the cone and when the dog is on the far side of the cone, turn the opposite direction from your dog 180 degrees and pick the dog back up on the left side.
See below for an explanation video of the tandem turn and front cross.
Below is a video of the front cross done on a single cone
Notice that I keep the toy in the Reinforcement Zone position. I want my dog to come in tight to be rewarded on this game.
Below is a video of tandem turns and front crosses done on two cones
Once you are very confident and your dog totally understands the game, you can move on to two cones. Practice only the tandem turn and the front cross. Do not try to replicate my cheat (we haven’t yet taught the dogs how to read a rear cross or you how to cue one.)
PB&J (Push Back & Jam)
The goal of this game is to get the dog excited and ready to work with you. Practice on both sides.
These are the basic mechanics of the PB&J
- Hold the dog’s collar or around their chest
- Have your toy or treat in the other hand
- Gently push back with the hand holding your dog
- Run forward.
- Switch the toy or treat to your other hand
- Reward the dog when it moves into the Reinforcement Zone.
See below for an example of the PB&J in action
Things to bear in mind while watching the video and practicing on your own:
- It is up to you if you want to make a noise or not.
- If you dog is easily excitable, it’s probably best to be quiet.
- If you need to rev your dog up you can make a funny noise to keep them focused.
- If you are using a toy to reward, keep moving until the dog latches onto the toy.
- If you are using food to reward, make sure your hand (and your dog) are by your side before you feed. RZ in right next to your knee/thigh, not a foot away.
WEEK 5 - 12/19/22
Continue practicing what we worked on in class and grow the behaviors. Check the Prior Homework page if you need a refresher on any of these:
Chill Out
Touch
Reinforcement Zone
Game On
IYC (It's Yer Choice)
Collar Grab
Basic Obedience
Cone work
Targeting
Beginning targeting: from your hand to the floor.
The start of targeting should begin with the target in your hand. Don’t be in a hurry to get the target on the ground. The most important step is to get the dog eager and excited to touch the target with his/her nose.
Progression:
- Present the target in your hand and reward for nose touch by placing a cookie on the target with your other hand.
- Vary the positioning of the target in your hand.
- Lower the target towards the ground.
- Prop the target on your foot.
- Drop/toss the target on the ground.
- If the dog is targeting your hand instead of the actual target, place a loop of tape on the back of the target to place your fingers through. This will remove your hand from the picture and get the dog focussing on the target.
- If you are having trouble getting the dog to focus on the target, you can smear a dab of peanut butter on it to get them interested enough that you can reward the nose touch. That will easily build the value of the target.
- If your dog cannot focus in a particular area, you can move to a different area where they can more easily focus.
Advanced targeting: target is on the ground.
Once the dog is driving to a target on the ground you can put a name to the action. I use Touch. If you already use Touch to mean something different, you can use Target instead. At this stage, you want to teach the dog to stay at the target until you give your release word.
How to build a solid targeting stay:
- The keys to a solid stay are:
- Heavy yet varied rewards (sometimes 1 big cookie, sometime 3 small cookies, etc.)
- Releasing the dog before it releases itself. (This is HUGE!)
- Move away from the target when you release the dog.
- Vary your position in relation to the dog.
- After releasing the dog, pick up the target and drop/toss it in a different location.
- Continue to feed while the dog’s nose is on the target.
Rapid rewarding for staying in place
DOs and DON'Ts for Targeting
Use the lists below to keep yourself on track.
DO...
- Click as soon as the dog's nose makes contact with the target
- Place the treat directly on the target.
- Look at the target. (The dog will learn to look where you are looking)
- Reward multiple times for multiple touches. If the dog's head moves away from the target and then the nose touches again, click and treat again.
- Reward for continued contact of the dog's nose with the target. Click and treat as appropriate.
- Vary the rate of reward, sometimes only 1 treat, sometimes 5.
DON'T...
- Click for anything but a full nose touch. There is no partial credit.
- Feed the dog directly from the hand, somewhere in the vicinity of the target.
- Look at your dog.
- Click while the dog's head is away from the target and then place the treat. The nose must touch the target before the click and treat happens..
- Move the target towards the dog's nose. The dog must go to the target, not the other way around.
- Only ever give 1 treat per click. A variable rate of reward will help keep the dog focused on the task at hand.
Cone Work Progression
Growing cone work: Add a turn after the dog circles the cone. Either continue the rotation or do a front cross to pick the dog up on the other side. Don’t try to go further than just one turn and one cone at this stage.
WEEK 4 - 12/12/22
Continue practicing what we worked on in class and grow the behaviors. Check the Prior Homework page if you need a refresher on any of these:
Chill Out
Touch
Reinforcement Zone
IYC (It's Yer Choice)
Collar Grab
Basic Obedience
Game On
Continue to practice on both sides with a quarter turn away from the dog when it reaches you.
After watching everyone practice at class this week, it appears that there is still some confusion about the Game On positioning and how translate it into motion. This body positioning is the core of how you will communicate with your dog on a course so it will take some time to feel natural but it is important to get it right.
These are the biggest things to remember:
- The Game On position is dictated by which side the dog is on.
- Your hand, leg and head should be back towards the dog on your side.
- Your hand should be held palm up, like you are inviting someone to take your hand.
- Maintain eye contact with your dog.
- When you run forward, your head should be turned back towards your dog so you can keep a connection.
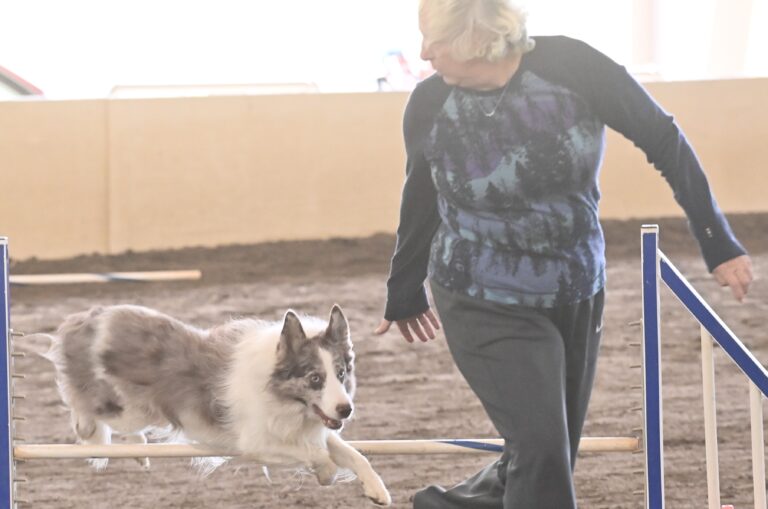
Michaela and Merlin demonstrating the correct positioning.
Cone Work
Practice a couple of minutes a day, if possible. You can use a small trash can or just buy a cone from Home Depot/Lowes for about $15 or $20. You can practice a lot of handling with a cone so it is worth the investment.
Cones are not actual agility obstacles so you may wonder why we start with them. There are several reasons.
- It is an easy yet important way for handlers to practice moving and working in Game On position.
- It teaches the dog how to watch and read the handler’s body language of the Game On.
- It also teaches the dog to respect the cue you are giving them. If you have your right leg back and right hand out, they will never be paid (rewarded) for coming to your left side.
- Vary your reward positioning around the cone. Sometimes 1/2 way around, sometimes 3/4 around and sometimes a full circle.
- Game On positioning is vital to show the dog where you want it to go. Don’t get lazy with your body positioning.
Troubleshooting:
If the dog tries to go to the wrong side, stop and get them back to the correct side. Show them your hand and your body positioning. Watch the video below for a demonstration.
If your dog gets distracted, you can make a noise to get their attention and then move into position. As you can see below, once I had the Geordi’s attention, I kept it while circling back to get into position to go again.
WEEK 3 - 12/5/22
Continue practicing what we worked on in class and grow the behaviors. Check the Prior Homework page if you need a refresher on any of these:
Chill Out
Touch
Reinforcement Zone
IYC (It's Yer Choice)
Collar Grab
Basic Obedience
Game On
Continue to practice on both sides with a quarter turn away from the dog when it reaches you.
Things to vary and progress to:
- Distance – number of steps from your dog before you release
- If you plan to increase your turn, only increase by a quarter turn per session.
- Mix up stopping straight and turning.
Troubleshooting:
- Remember to always reward with the hand closest to the dog. At this stage, always show the dog an empty hand. Keep your food or toy in the opposite hand and switch it over as the dog catches up to you.
- When turning, keep your hand at your side, ready to treat. The dog will be watching you very closely because they want their reward to bear in mind that you are teaching your dog how you turn. This is why it is so important to be sure that your Game On is a natural and comfortable position that you can maintain at a standstill, a walk and a run.
Week 2 - 11/28/22
Continue practicing what we worked on in class and grow the behaviors. Check the Prior Homework page if you need a refresher on any of these:
Chill Out
Touch
Reinforcement Zone
IYC (It's Yer Choice)
Collar Grab
Basic Obedience
A note about touch that I think I forgot to mention earlier: feed the dog out of the touch hand. Put out your hand, when the dog does a nose touch, use your other hand to place a treat in the touch hand and let the dog eat the cookie out of the touch hand.
Game On
Practice on both sides.
Basic body positioning: whatever side your dog is on, your arm and leg should be back, closer to your dog, and your head turned towards the dog. The photo below shows the perfect positioning of the arm and head. Disregard my legs and the extreme shoulder as I was doing a blind cross at the time. Your leg on the side the dog is on should also be back.
Try practicing the Game On position without your dog until it starts to feel natural. Imagine you are about to challenge someone to a race. You want to win so your body is facing the direction you want to go but your arm and leg are back towards the person as if inviting them to go with you and your head is turned towards them. Crouch a little as if you are about to take off running.
- Take a natural step forward with one foot. Now slightly bend the knee on that leg and leave the other straight. That is the Game On leg positioning.
- Your arm does not have to be way behind you or very high. With your arms at rest and your shoulders straight, simply swing your arm out to the side and a bit behind your body.
Week 1 - 11/14/22
Download the Hierarchy of Rewards (below) and determine your dogs favorite rewards. Bring low, medium and high-value treats to class.
If you don’t already know how much your dog generalizes, read the Generalization information below and test a known behavior in a new setting.
Introduce your dog to at least 3 new safe surfaces. (examples: a large fallen log, a low wide wall, plywood, gravel, playground, bridges, etc.) It’s perfectly acceptable to lure the dog onto the new surface using cookies.
Continue practicing what we worked on in class and grow the behaviors.
Read the Rules for Pushing Criteria below for help wilth expanding criteria.
Chill Out
Hang out at a coffee shop, near a grocery store, at a park, etc. for a few minutes and ask your dog to chill out. You sit on a chair, bench, wall, etc and ask your dog to lie calmly beside/in front of you. and every so often, drop a cookie between your dogs paws.
- Toubleshooting:
- Lower your time criteria. Five minutes may be a reasonable time to chill at a coffee shop but your dog may only be able to handle 1-2 minutes at a football game.
- Use very high value rewards.
- Back away from the distraction to make it easier for your dog to relax.
- Have your dog face you instead of the distraction.
- Toubleshooting:
Basic Obedience
Practice your sit/stays on both sides.
- Try to grow the behavior :
- Try to extend your time to 25 seconds on each side.
- Add a step forward, pause, step back, reward and release.
- Start with just one second before stepping back to reward and release. Try to work up to 5 seconds a side.
- Troubleshooting:
- If the dog is uncomfortable/unused to sitting beside you, ask the dog to sit and then move yourself in position beside the dog.
- Review the Rules for Pushing Criteria
Reinforcement Zone
This will get your dog comfortable with being beside you and getting treats on your side instead of in front. Remember to work both sides.
- If your dog has never heeled before, start with the dog facing you. Have your hand at your side and tap your thigh or knee (depending on the height of your dog) and then turn your hand over to give them the treat.
- Once the dog is comfortable at your side, turn them around so you are both facing the same way. Step back with the leg next to your dog, keeping your hand on your thigh/knee, then step forward to bring the dog to face your same direction. Tap & feed.
- Take a step or two forward, tapping and feeding, and gradually progress to several steps.
- Next start working on a tandem turn. This is basically a quarter-turn pivot while tapping and feeding.
- Progress by quarter turns all the way up to a full 360 degree turn.
Troubleshooting:
- If you are losing your dog’s attention when you move, make sure you have several treats in your hand and tap while you move to keep the dog interested.
Things to remember:
- Always tap your thigh/knee before treating.
- The dogs body should be parrallel to your own body when you tap and treat.
Touch
This is a non-verbal cue. Offer your flat hand (thumb up, as if you were going to shake hands) and click/treat for a nose touch. Work both hands. Once you dog can reliably nose touch, continue to grow the behavior but keep your hand thumb up and maintain the nose touch criteria:
- Start varying the distance between your hand and your dog.
- Vary the height of your hand.
- Offer your hand when your dog is a step or two away from you.
Collar Grab
Touch/grab your dogs collar (reach under their head, not over) and give the dog a treat with the other hand once you are touching/grabbing the collar. Work both hands. Grow the behavior as much as you can.
- Go from touching to an actual hold on the collar.
- Gently pull on the collar.
- Encourage your dog to step forward with you to get the treat while you hold the collar.
- Have the cookie on a table/counter,etc. collar grab and step over to the counter to retrieve and deliver the cookie.
IYC (It's Yer Choice)
This game teachs the dog self-control.
- With a big dog, sit in a chair. With a small dog, sit on the floor.
- Put 5 or so small treats in your hand and rest the hand on your knee.
- When the dog tries to take a treat, close your hand.
- When the dog turns its head away or back away, open your hand.
- Pick up one of the treats in your hand, using your other hand, and give it to the dog if the dog remains away from your hand.
- If the dog dives back in to grab the treat, return the treat to your hand and close your hand.
- Repeat steps 4 through 6 until all treats are gone.
- Important rules to remember when playing this game:
- The dog gets all of the treats you have in your hand, they just have to earn them.
- Do not move your hand away (unless the dog is pawing at you), just close your hand until tthe dog backs away and then open your hand again.
- The dog should not eat the treats from your hand. Always use your other hand to give the treat to the dog.
